
This document ensures proper CALIFIA® Patient Module (CPM) setup, functionality, and leak prevention, guiding users through initialization, licensing verification, device selection, and fluid level checks.
Pre-Priming Performance Checklist
☐ No visible damage to box or contents.
☐ Turn on CPM and check proper initiation sequence. Turn on the CPM and confirm it initiates correctly. Within 27 seconds, you should hear a sequence of valve openings and closings, indicating successful initiation.
☐ Laptop detects CPM correctly. Confirm that the laptop recognizes the CPM. Access the left-side menu, select “About,” and verify that the CPM is detected. If not, use the shortcut Shift + Ctrl + I to attempt detection. If issues persist, check all connections or consult a Biomed Simulation professional.
 Figure 1: About tab.
 Note: Due to technological improvements, your CPM version may differ from the one in Figure 1.
☐ Software Licensing Verification. Verify that the software is fully licensed. Open left side Menu and click on “Licensing”. Confirm it appears as fully licensed, as in Figure 2.

Figure 2: Licensing tab.
☐ Device Selection Confirmation. Ensure “Califia Patient Module” is selected in the top right corner of the initial screen (see Figure 3).

Figure 3: Device Selection tab.
☐ Touchscreen Functionality. Verify that the touchscreen is properly connected and responsive. Check touch capability.
☐ Reservoir Capacity Check. Before priming and operating the peristaltic pump, make sure the reservoir contains at least 2.5L of fluid.
IMPORTANT: Do NOT overfill the tank and do NOT move CPM with water inside.
Post-Priming Performance Checklist
☐ Check for any possible leaks, take the top of the CPM off and make sure everything is dry, around the tank, tubing, joints and valves. Also, check there are no leaks in the external tubing you are using.
For opening the top cover of the device, remove all the screws from the top using a screwdriver, Figure 1.
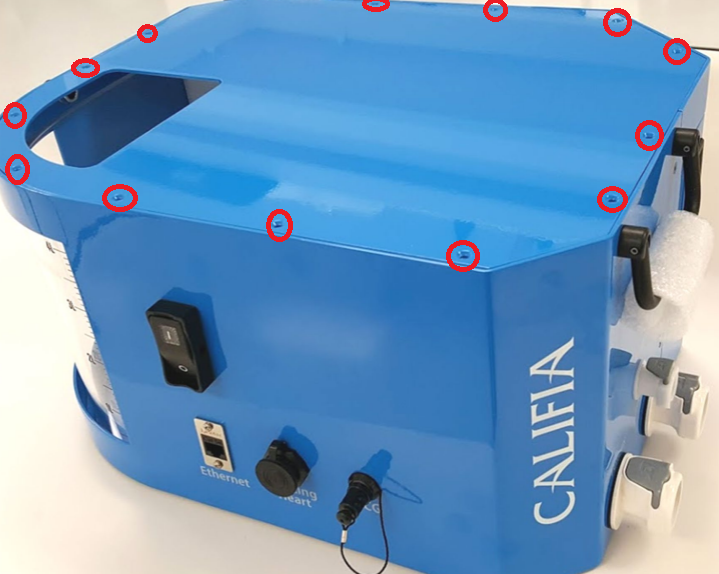
Figure 4: Screws on the top cover of CPM.
☐ Check level sensor: Go into CALIFIA® Simulator Software and go to the "Califia Controls" tab. Check the actual CPM fluid level is accurately displayed on the indicator, Figure 2.

Figure 5: CPM Reservoir indicator.
If something does not work as expected or you need further assistance, please contact a Biomed Simulation representative.